wubba lubba dub dub.
post @ 2026-11-14
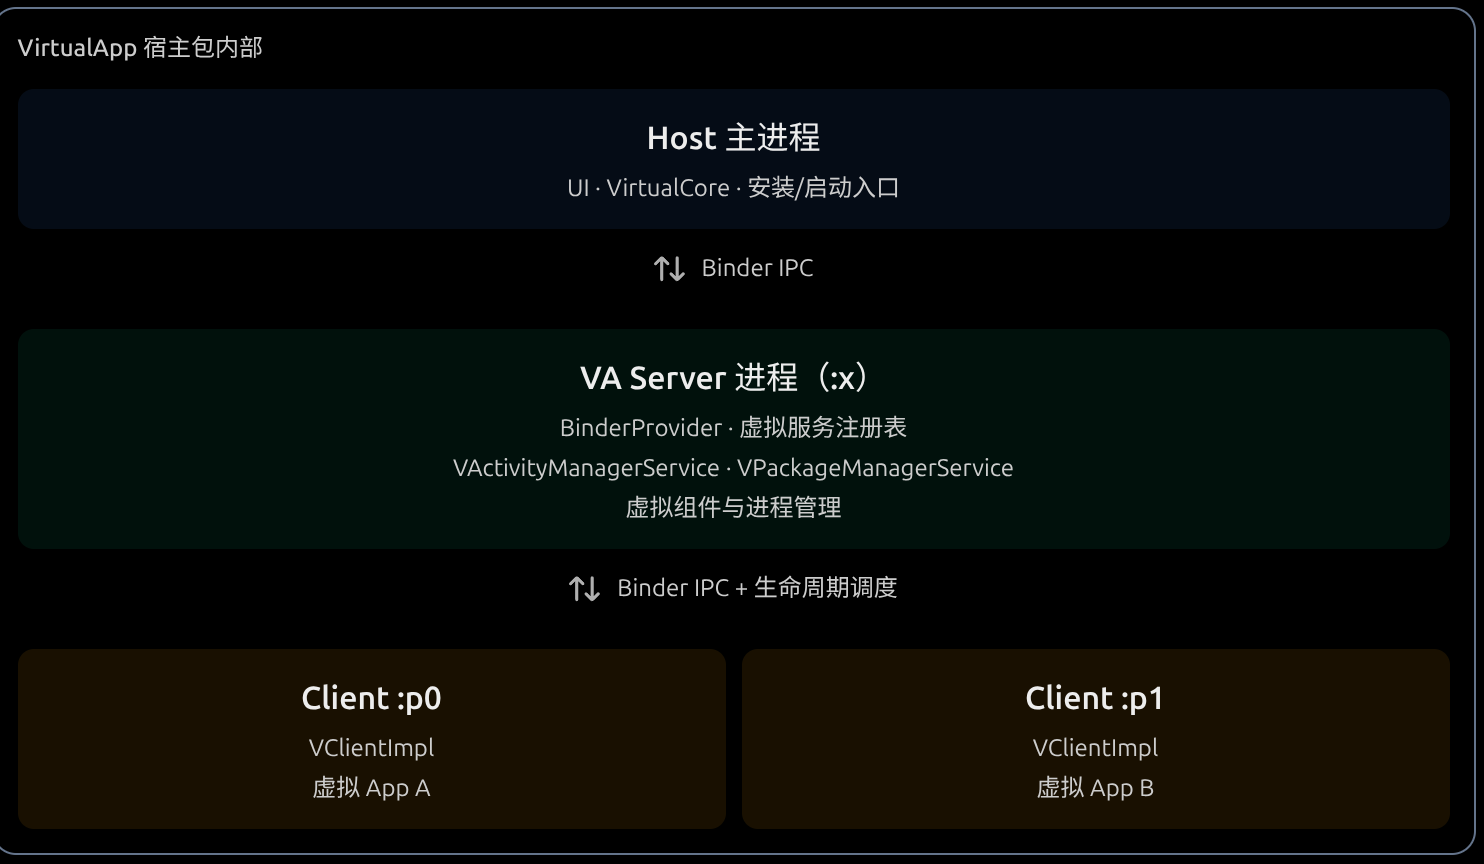
  • 最近在看安卓的应用级虚拟化的架构 这一章我们先来说一下大致架构 大致框架是这样的 host 主进程,va server 进程 和各个 client进程。这里host主进程就可以看作vritual app本身 ,然后vaserverkey看作虚拟机内部的一个framwork 架构 。后门就是各个client 进程 而因为我们的虚拟机内部没有 service manager进程来要负责 Binder 服务的注册、查询和管理。所以我们还需要自己实现一个类似的结构
构建一个类似service manager的服务

首先我们先抛开binder的底层机制,我们需要明白,如果一个进程要通过binder调用另一个进程,那么这个进程就要获取到他的ibinder 我们一层一层往下看

binderprovider

继承自组件contentprovider

1
2
3
4
5
6
7
8
9
10
11
12
13
14
15
16
17
18
19
20
21
22
23
24
25
26
27
28
29
30
31
32
33
34
35
36
37
38
39
40
41
42
43
44
45
46
47
48
49
50
51
52
53
54
55
56
57
58
59
60
61
62
63
64
65
66
67
68
69
70
71
72
73
74
75
76
77
78
79
80
81
82
83
84
85
86
87
88
89
90
91
92
93
94
95
96
97
98
99
100
101
102
103
104
105
106
107
108
109
110
111
112
113
114
115
116
117
118
119
120
121
122
123
124
125
126
127
128
129
130
131
132
133
134
135
136
137
138
139
140
141
142
143
144
145
146
147
148
149
150
151
152
153
154
155
156
157
158
159
160
161
162
package com.lody.virtual.server;

import android.content.ComponentName;
import android.content.ContentProvider;
import android.content.ContentValues;
import android.content.Context;
import android.content.Intent;
import android.content.ServiceConnection;
import android.database.Cursor;
import android.net.Uri;
import android.os.Build;
import android.os.Bundle;
import android.os.IBinder;
import android.os.RemoteException;
import android.os.ResultReceiver;

import com.lody.virtual.client.core.VirtualCore;
import com.lody.virtual.client.ipc.ServiceManagerNative;
import com.lody.virtual.client.stub.KeepAliveService;
import com.lody.virtual.helper.compat.BundleCompat;
import com.lody.virtual.helper.compat.NotificationChannelCompat;
import com.lody.virtual.server.accounts.VAccountManagerService;
import com.lody.virtual.server.am.VActivityManagerService;
import com.lody.virtual.server.content.VContentService;
import com.lody.virtual.server.device.VDeviceManagerService;
import com.lody.virtual.server.interfaces.IServiceFetcher;
import com.lody.virtual.server.job.VJobSchedulerService;
import com.lody.virtual.server.location.VirtualLocationService;
import com.lody.virtual.server.notification.VNotificationManagerService;
import com.lody.virtual.server.pm.VAppManagerService;
import com.lody.virtual.server.pm.VPackageManagerService;
import com.lody.virtual.server.pm.VUserManagerService;
import com.lody.virtual.server.vs.VirtualStorageService;

/**
* @author Lody
*/
public final class BinderProvider extends ContentProvider {

private final ServiceFetcher mServiceFetcher = new ServiceFetcher();
private static boolean sInitialized = false;

@Override
public boolean onCreate() {
return init();
}

public static boolean isInitialized() {
return sInitialized;
}

private boolean init() {
if (sInitialized) {
return false;
}
Context context = getContext();
if (context != null) {
if (android.os.Build.VERSION.SDK_INT >= android.os.Build.VERSION_CODES.O) {
NotificationChannelCompat.checkOrCreateChannel(context, NotificationChannelCompat.DAEMON_ID, "daemon");
NotificationChannelCompat.checkOrCreateChannel(context, NotificationChannelCompat.DEFAULT_ID, "default");
}
try {
context.startService(new Intent(context, KeepAliveService.class));
} catch (Exception e) {
e.printStackTrace();
}
}

if (!VirtualCore.get().isStartup()) {
return false;
}
VPackageManagerService.systemReady();
addService(ServiceManagerNative.PACKAGE, VPackageManagerService.get());
addService(ServiceManagerNative.ACTIVITY, VActivityManagerService.get());
addService(ServiceManagerNative.USER, VUserManagerService.get());
VAppManagerService.systemReady();
addService(ServiceManagerNative.APP, VAppManagerService.get());
if (Build.VERSION.SDK_INT >= Build.VERSION_CODES.LOLLIPOP) {
addService(ServiceManagerNative.JOB, VJobSchedulerService.get());
}
VNotificationManagerService.systemReady(context);
addService(ServiceManagerNative.NOTIFICATION, VNotificationManagerService.get());
VAppManagerService.get().scanApps();
VAccountManagerService.systemReady();
VContentService.systemReady();
addService(ServiceManagerNative.ACCOUNT, VAccountManagerService.get());
addService(ServiceManagerNative.CONTENT, VContentService.get());
addService(ServiceManagerNative.VS, VirtualStorageService.get());
addService(ServiceManagerNative.DEVICE, VDeviceManagerService.get());
addService(ServiceManagerNative.VIRTUAL_LOC, VirtualLocationService.get());
sInitialized = true;
return true;
}

private void addService(String name, IBinder service) {
ServiceCache.addService(name, service);
}

@Override
public Bundle call(String method, String arg, Bundle extras) {
if (!sInitialized) {
init();
}
if ("@".equals(method)) {
Bundle bundle = new Bundle();
BundleCompat.putBinder(bundle, "_VA_|_binder_", mServiceFetcher);
return bundle;
}
return null;
}

@Override
public Cursor query(Uri uri, String[] projection, String selection, String[] selectionArgs, String sortOrder) {
return null;
}

@Override
public String getType(Uri uri) {
return null;
}

@Override
public Uri insert(Uri uri, ContentValues values) {
return null;
}

@Override
public int delete(Uri uri, String selection, String[] selectionArgs) {
return 0;
}

@Override
public int update(Uri uri, ContentValues values, String selection, String[] selectionArgs) {
return 0;
}

private class ServiceFetcher extends IServiceFetcher.Stub {
@Override
public IBinder getService(String name) throws RemoteException {
if (name != null) {
return ServiceCache.getService(name);
}

return null;
}

@Override
public void addService(String name, IBinder service) throws RemoteException {
if (name != null && service != null) {
ServiceCache.addService(name, service);
}
}

@Override
public void removeService(String name) throws RemoteException {
if (name != null) {
ServiceCache.removeService(name);
}
}
}
}

我们稍后会讲解几个结构首先这个ServiceFetcher,是作为调用的接口,通过控制ServiceCache 控制和调用服务。至于什么服务,其实就是server 提供的一些类似于 安卓系统级的binder服务。 因为contentprovider 的call 是通过ams管理并能够被外部通过contentresover调用的. 所以我们还需要在 app 的mainfest专门写注册代码以便ams发现并管理

1
2
3
4
5
6
7
8
    <!-- lib/src/main/AndroidManifest.xml:381-386 -->
<provider
android:name="com.lody.virtual.server.BinderProvider" ← 类
android:authorities="${AUTHORITY_PREFIX}.virtual.service.BinderProvider" ← 唯一标识
android:exported="true" ← 允许跨 uid
android:permission="${PERMISSION_PREFIX}.permission.SAFE_ACCESS" ← 签名级准入
android:process="@string/engine_process_name" /> ← 承载进程 :x

根据前面的代码private class ServiceFetcher extends IServiceFetcher.Stub 他继承的IServiceFetcher.Stub 本身就是一个ibinder对象,所以我们就只需要在call函数返回bundle

阅读此文

ollvm--混淆

这里用不知道哪里找到的ollvm17混淆, https://github.com/DreamSoule/ollvm17 不算很new,主要用于研究一些好玩的

一些基础知识

关系支配树

定义:如果从函数入口到基本块 B 的所有路径都必须经过基本块 A,则称:A支配B

1
2
3
4
5
6
7
8
  entry
|
v
check
/ \
A B
\ /
merge

例如这里check就支配A,B和merge

clang 编译器的编译流程

clang是一种用llvm 作为后端的编译器

阅读此文
post @ 2026-07-20

常见国密算法

这次 商密杯,做点赛前的康复训练吧. 国密算法是我国商用密码体系的算法,常见的公开算法有

算法 类型 用途
SM2 非对称算法 数字签名,公钥加密,密钥交换
SM3 摘要算法 数字摘要,完整性校验
SM4 对称分组密码 数据加密
ZUC 序列密码 移动数据通信加密
SM9 标识密码

SM4分组密码算法

加密过程

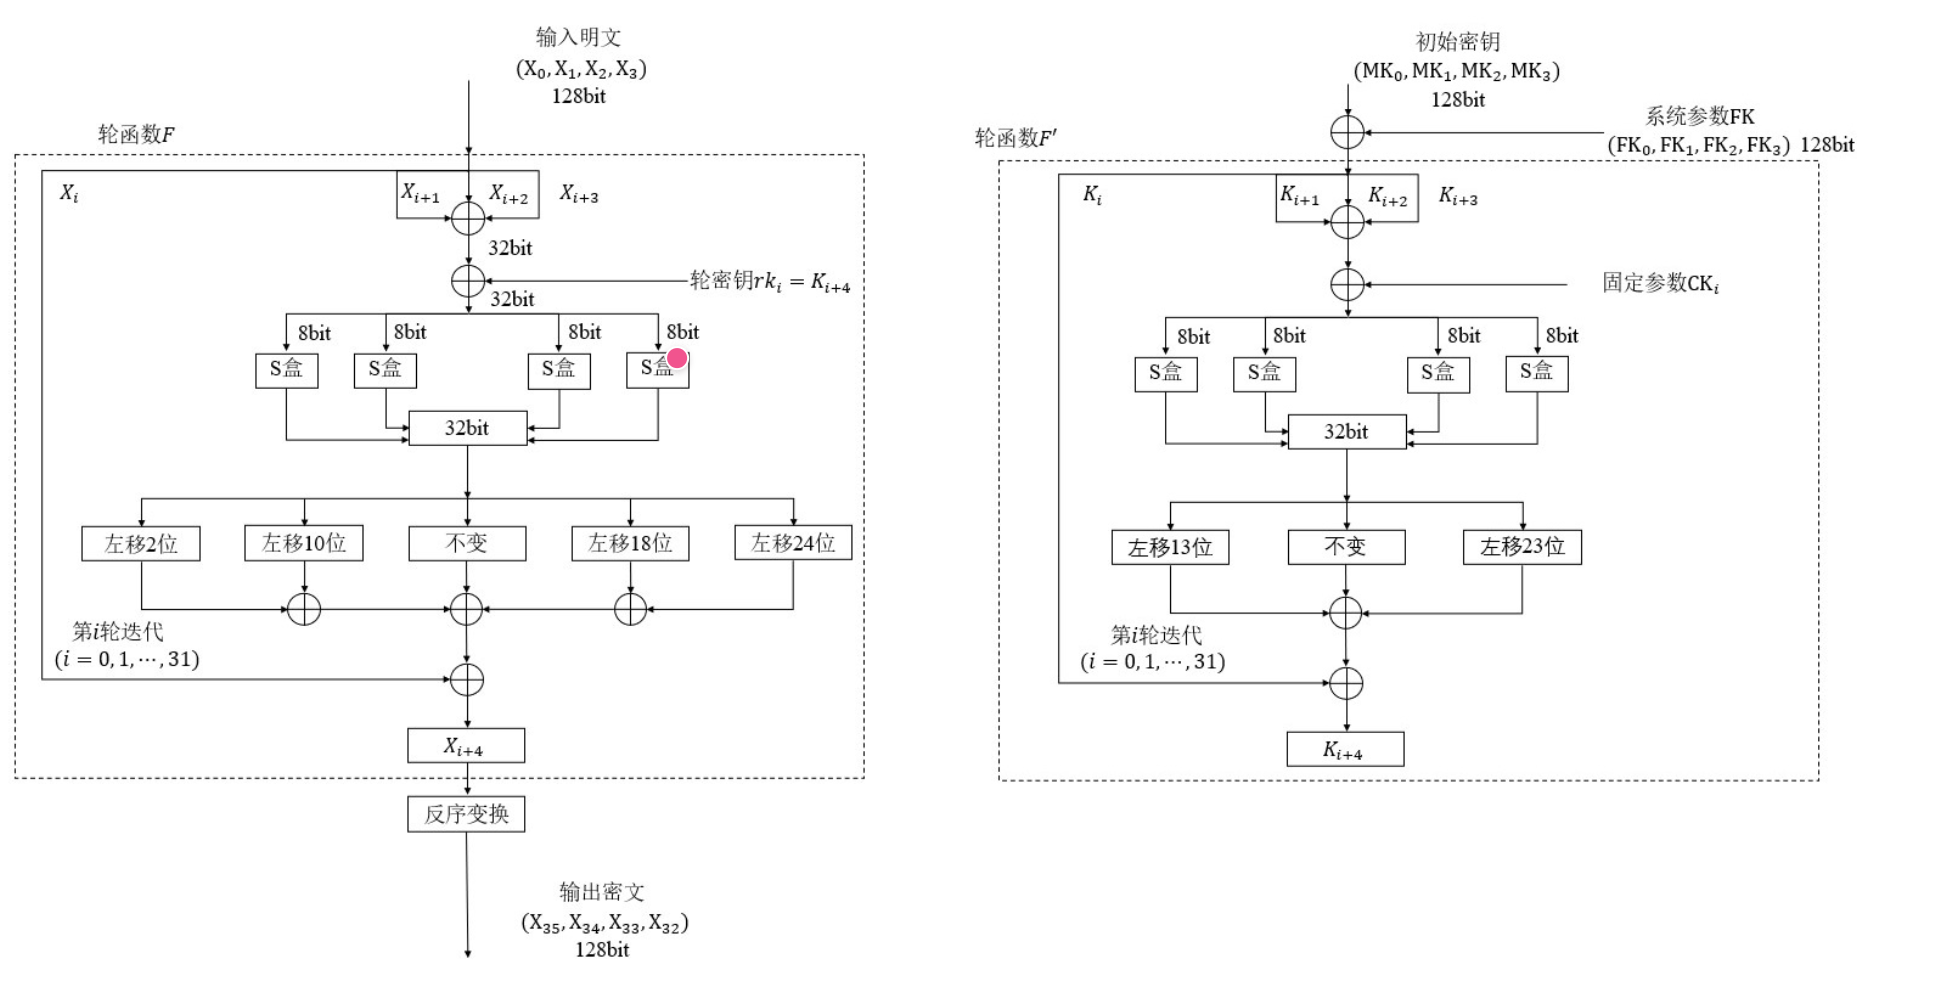
输入128bit明文M=(X0,X1,X2,X3) Key=(MK0,MK1,MK2,MK3) 输出密文(X0,X1,X2,X3) 加密流程$X_{i}$待定$X_{i+1},X_{i+2},X_{i+3}$ 然后 获得 $SBOX_INPUT=X_{i+1}\oplus X_{i+2} \oplus X_{i+3} \oplus rk_{i}$ 之后拆分成4*8bit进入Sbox替换,获得32bit的Sbox_output 结果 之后将这个32bit 进行上述循环左移动xxx位.得到$y_{2} ,y_{10},y,y_{18},y_{24}$ $X_{i+4}=y_{2}\oplus y_{10} \oplus y \oplus y_{18} \oplus y_{24} \oplus x_{i}$ 最后获得输出密文$(X_{35},X_{34},X_{33},X_{32})$ 密钥扩展 大同小异,见参考图

解密过程

$x_{4}=x_{0}\oplus T(x_{1}\oplus x_{2} \oplus x_{3 \oplus rk_{0}})$ 这是加密过程的函数 那么 $x_{0}=x_{4}\oplus T(x_{1}\oplus x_{2} \oplus x_{3 \oplus rk_{0}})$ 那么$x_{31}=x_{35}\oplus T(x_{32}\oplus x_{33} \oplus x_{34} \oplus rk_{31})$ 那么依次类推就能得到前面的

算法实现

阅读此文
post @ 2026-07-06

手脱upx

upx壳是什么

一个基础的压缩壳,这里就以 elf的upx 加壳为示例来做.当然仅仅作为练手还是不错的.因为我的拖延,也花费了些许的时间.

upx 的压缩和解压

upx壳的压缩

分为四个步骤.

pack1

生成新的elf header.先生成能生成的一个elf header的框架

pack2

阅读此文

二进制安全-elf文件结构和动态链接

Rop链 因为现在的NX保护,构造shellcode变得困难.所以现在一般用一些方法让ret返回到程序原本就有的代码去执行,

checksec

可以确定程序保护机制的开启情况

1
2
3
4
5
6
7
8
9
10
11
12
 ~/St/b/p/6/ret2libc (1)  checksec ./pwn            ✔  sage-10.6   16:05:18 
[*] '/home/f0x/Study/binbinbin/pwn/6month/ret2libc (1)/pwn'
Arch: amd64-64-little
RELRO: Partial RELRO
Stack: No canary found
NX: NX enabled
PIE: No PIE (0x400000)
SHSTK: Enabled
IBT: Enabled
Stripped: No


可以简要介绍一下这几个保护机制

Arch: amd64-64-little

属性是小端序.这里是64bit开启小端序

  • 大端序:符合人类阅读顺序,高位字节放在低地址处。
  • 小端绪: 低位字节放低地址处
阅读此文
post @ 2026-06-16

这次我是出invisble这个题目的人,时间比较紧只有两周所以质量可能不是很能提,多多担待 如果有任何题目或者其他题目的疑问可以找我 ps:怎么没人看我的无敌少侠,而是直接拿ai放个链接梭了,伤心... 参考论文:https://eprint.iacr.org/2019/861.pdf cve:https://github.com/HugoBond/CVE-2024-31497-POC

Invincible

这里是一个web端有jwt校验的题目,我们的思路是想办法获得admin权限. 值得注意的是,这个,他限制注册账户.并且你反复清空cookie状态 也不会 重新生成新的jwt .so我们怎么办呢 回顾一下ecdsa的流程.设定 有限域p下的 私钥 d, 公钥 Q,消息m. 椭圆曲线 E 生成元点G nonce k= xxx 在有限域p下(0,p)的一个随机数. R=kG, r=X(R) $s=k^{-1}(e+rd) Mod~p$ e= hash(m)

最终获得签名 (r,s) 验证签名 ,已经知道 消息m ,签名(r,s),公钥 Q $k=s^{-1}(e+r*d)$ 所以$s^{-1}eG+s^{-1}rQ=R_{1}$ 由此得到$X(R_{1})=r$ 这个题泄漏了什么信息呢? 我们的k 是用foxhash生成的

1
2
3
4
5
6
7
8
9
10
11
12
13
14
15
16
17
18
19
20
21
22
23
24
25
26
27
28
29
30
31
32
33
34
35
36
37
38
39
40
41
42
43
44
45
46
47
48
49
50
51
52
53
54
55
56
57
58
59
60
61
62
63
64
65
66
67
68
69
70
71
72
73
74
#!/usr/bin/env python3
from __future__ import annotations

from hashlib import sha256
from random import Random, getrandbits

from Crypto.Cipher import AES
from Crypto.Util.number import bytes_to_long, isPrime, long_to_bytes, sieve_base


HASH_WORD_BITS = 16
HASH_WORDS = 32

def generate_prime(bits: int, a: int) -> int:
while True:
p_sub = 2
for prime in sieve_base:
p_sub *= prime
if p_sub.bit_length() > bits - 2:
break

for k in range(2, a, 2):
p = p_sub * k + 1
if isPrime(p):
return p
class FoxHash:
def __init__(self):
self.key = getrandbits(128)
self.iv = getrandbits(128)
self.key_bytes = long_to_bytes(self.key, 16)
self.iv_bytes = long_to_bytes(self.iv, 16)

def _to_bytes(self, x):
if isinstance(x, int):
x = long_to_bytes(x)
elif isinstance(x, str):
x = x.encode()
elif isinstance(x, bytearray):
x = bytes(x)
return x[-16:].rjust(16, b"\x00")

def _to_int(self, x):
if isinstance(x, int):
return x
if isinstance(x, str):
x = x.encode()
elif isinstance(x, bytearray):
x = bytes(x)
return bytes_to_long(x or b"\x00")

def hash(self, m):
m = sha256(m).digest()
c1 = AES.new(self.key_bytes, AES.MODE_CBC, iv=self.iv_bytes).encrypt(m)
c2 = AES.new(c1, AES.MODE_CBC, iv=self.iv_bytes).encrypt(self.key_bytes)
c1 = sha256(c1).digest()
c2 = sha256(c2).digest()
h = []
r1 = Random(bytes_to_long(c2))
for _ in range(32):
h.append(r1.getrandbits(16))

r2 = Random(self.key)
n = generate_prime(int(int.from_bytes(m, "big")) % 512, max(500, r2.getrandbits(15)))

r3 = Random(n)
pos = r3.getrandbits(5)
value = r3.getrandbits(16)
h[pos] = value
res = 0
for x in h:
res = (res << 16) | x

return res

测试过的话会发现,

1
2
3
4
5
6
7
8
9
10
11
12
def generate_prime(bits: int, a: int) -> int:
while True:
p_sub = 2
for prime in sieve_base:
p_sub *= prime
if p_sub.bit_length() > bits - 2:
break

for k in range(2, a, 2):
p = p_sub * k + 1
if isPrime(p):
return p

这个函数的只要 相同bit 位次,输出的素数是一样的 我们之后得到的 pos和value其实都是可预测的泄漏连续16bit 由此我们就可以构造一个lattice

$k_{i}=s^{-1}{i}*{h{i}+r_{i}d}$ $k_{i}=konw_{i}+high_{i}+low_{i}$ $k_{i}=konw2^{p}+low+high*2^{p+16}$

阅读此文
post @ 2026-06-11

ez_pwn

遇到的问题

  1. 前面三个 setvbuf(stdout, 0LL, 2, 0LL); setvbuf(stdin, 0LL, 2, 0LL); setvbuf(stderr, 0LL, 2, 0LL); 这个是取消这三个stdio函数的缓冲, stdio函数有个缓冲机制,输入的 内容比如
1
2
3
4
5
6
7
8
9
#include <stdio.h>
#include <unistd.h>

int main() {
printf("hello");
char* a;
read(0,a,100);
return 0;
}

这里hello 如果 printf里面没有\n就会保存到 缓冲区里面,不输出到终端, 指导遇到 调用下一个stdio 里面的标准输入输出函数 的时候会刷新stdio的状态 或者在整个程序结束的时候释放缓冲区里面的内容再输出. 这里的read是系统调用syscall 表示从 某个fd(文件描述符)读取数据到内存 (挖个坑后面可能会讲一下文件描述符和系统调用,是的.只是挖坑) anyway看了半天,讲文件描述符的后面一起看吧, 反正就是这个 setvbuf(stdin, 0LL, 2, 0LL);比如就是把stdin这个函数的int setvbuf(FILE *stream, char *buf, int mode, size_t size);2 指的是#define _IONBF 2 就是没有缓冲区 各种缓冲区

1
2
3
4
  _IOFBF // full buffering,全缓冲  ,等缓冲区满、程序退出、手动 `fflush` 时才输出
_IOLBF // line buffering,行缓冲 ,\n输出
_IONBF // no buffering,无缓冲,直接输出

之后这样设置我们printf 无论怎样都是直接输出了

这里其实是一个最简单的栈溢出,难度不高. 原因是call这个指令在进入另一个函数的时候, call 是把一个rip 的当前地址 push入栈, 然后再 jmp到函数地址. push 是 例如 push rbp,把栈底的寄存器 ,先扩大栈 让rsp生长保存到rsp 保存的栈顶存放的内存

1
2
sub rsp, 8
mov [rsp], rbp
阅读此文
post @ 2026-05-19

cpp智能指针

引入

在cpp 中,我们用new来定义一个我们自己掌控生命周期的对象. 他不像局部变量这种会在函数结束的时候销毁,或者普通全局变量会在程序结束的时候变量所在内存被销毁. 我们需要手动delete,但是这样的步骤就是有点繁琐了,比如我们这么写

1
2
3
4
5
6
7
8
9
10
11
12
13
#include <iostream>

int main() {
while (true) {
int* p = new int[1000000];

std::cout << "申请了一块内存" << std::endl;
delete p;
}

return 0;
}

这个p在这里如果没有delete p就会疯狂的 申请新的内存,内存疯涨,建议不要轻易尝试,可能会死机 所以这里我们的智能指针就解决这样一些问题

“申请了堆内存以后,忘记释放、重复释放、异常情况下没法正确释放” 这些资源管理问题。

1
2
3
4
5
6
7
8
9
10
11
12
13
#include <iostream>
#include <memory>
void test() {
auto p = std::shared_ptr<int[]>(new int[1000000]);
std::cout << "申请了一块内存" << std::endl;
}
int main() {
while (true) {
test();
}

return 0;
}

这里智能指针就会自动销毁int的内存.智能指针会在指针p销毁的时候,同时对应指向的内存也会被销毁,当然下面还是要具体情况具体分析. cpp一共提供了三种智能指针,后续我们基于具体情况也会讲智能指针自动销毁的原理

delelte 和delete[]的区别

阅读此文

post @ 2026-05-04

裸 VPS 使用 sing-box 搭建 VMess 代理教程

本文档适用于裸 VPS 手动部署 sing-box,不使用面板、不使用域名、不使用 TLS、不使用 Reality。

配置方案:

1
VMess + TCP + none + alterId 0 + 端口 18080

不过这个vps需要找那种有国内线路的,一般很多国外服务器国内无法直连,网速也偏慢.

注意:VMess 明文 TCP 不适合长期高强度使用。长期使用建议改成 VLESS + Reality 或其他带 TLS/伪装的方案。


一、准备条件

推荐系统:

阅读此文

参考activity生命周期

onCreate()

activity必须实现此回调,在系统初次创建Activity的时候就会触发,进入已经创建的状态 在OnCreate()中,执行的基本应用逻辑,在activity内仅发生一次

1
2
3
4
5
6
7
8
9
10
11
12
13
14
15
16
17
18
19
20
21
22
23
24
25
26
27
28
29
30
31
32
33
34
35
36
37
38
39
40
41
42
43
44
45
protected void onCreate(Bundle bundle) {  
super.onCreate(bundle);
ExplainUtils.setSystemUiVisibility(getWindow().getDecorView());
if (Build.VERSION.SDK_INT >= 28) {
WindowManager.LayoutParams attributes = getWindow().getAttributes();
attributes.layoutInDisplayCutoutMode = 1;
getWindow().setAttributes(attributes);
}
if (Build.VERSION.SDK_INT >= 30) {
WindowInsetsController windowInsetsController = getWindow().getDecorView().getWindowInsetsController();
windowInsetsController.hide(WindowInsets.Type.statusBars());
windowInsetsController.hide(WindowInsets.Type.navigationBars());
windowInsetsController.hide(WindowInsets.Type.systemBars());
windowInsetsController.setSystemBarsBehavior(2);
}
getWindow().setStatusBarColor(getResources().getColor(R.color.transparent));
getWindow().setNavigationBarColor(getResources().getColor(R.color.transparent));
if (!isTaskRoot()) {
MSLog.m11849i(TAG, "!isTaskRoot()");
boolean z = getIntent().getSourceBounds() != null;
MSLog.m11849i(TAG, "fromLauncher:" + z);
if (z) {
finish();
return;
} else if (isYSDK()) {
MSLog.m11849i(TAG, "isYSDK:true");
MsldLifecycleUpdata.get().onNewIntent(this, getIntent());
finish();
return;
}
}
if (ExplainUtils.isCheckProtocal(this)) {
MsThreadUtil.postDelayedMainThread(new Runnable() { // from class: com.ms.sdk.plugin.explain.ExplainActivity.1
@Override // java.lang.Runnable
public void run() {
ExplainUtils.toNext(ExplainActivity.this);
}
}, 300L);
return;
}
setWindowStyle();
initView();
initGirdView();
}

例如这里基于api版本,初始化状态栏.初始化系统ui之类的功能

Onstart

当Activity进入已启动状态,系统会调用Onstart(),从调用会以应用准备activity进入前台并变为可互动状态. 当 activity 进入“已启动”状态时,所有具有生命周期感知能力的组件 activity 生命周期的剩余时间会收到 ON_START 事件。 onStart() 方法完成 与“已创建”状态一样,activity 不会保持 “已启动”状态此回调完成后,Activity 将进入 处于_已恢复_状态,并且系统会调用 onResume() 方法。

onResume()

当activity进入"已恢复" 状态,会进入前台,并且执行onResume()系统调用,这是用户与应用的交互状态,就是我们真正运行的那个界面. 官方文档描述的是,如果焦点远离应用(这里的焦点应该是主屏幕是否在使用这个activity) 例如接听来电的设备、用户 导航到其他 activity,或设备屏幕关闭。就会退出交互状态

阅读此文
⬆︎TOP